• Skip to primary navigation
  • Skip to main content
CURIO SG

CURIO SG

Holistic Education

  • Home
  • Programmes
    • Secondary School Programmes
      • English Language ‘O’ Level Programme
      • English Literature ‘O’ Level Programme
    • Junior College Programmes
      • English Literature ‘A’ Level Programme
      • GCE ‘A’ Levels: General Paper
    • IP
      • IP Programme: English Language
      • IP Programme: English Literature
    • Crash Courses
      • O Levels English Language
  • Fees & Schedule 2025
  • Free Resources
  • About
  • Journal
  • Curio Assessment Books
  • Show Search
Hide Search
You are here: Home / Archives for DIY

DIY

10 Halloween Costume Ideas for Kids 2024

Nadya Sharfina · October 14, 2024 · Leave a Comment

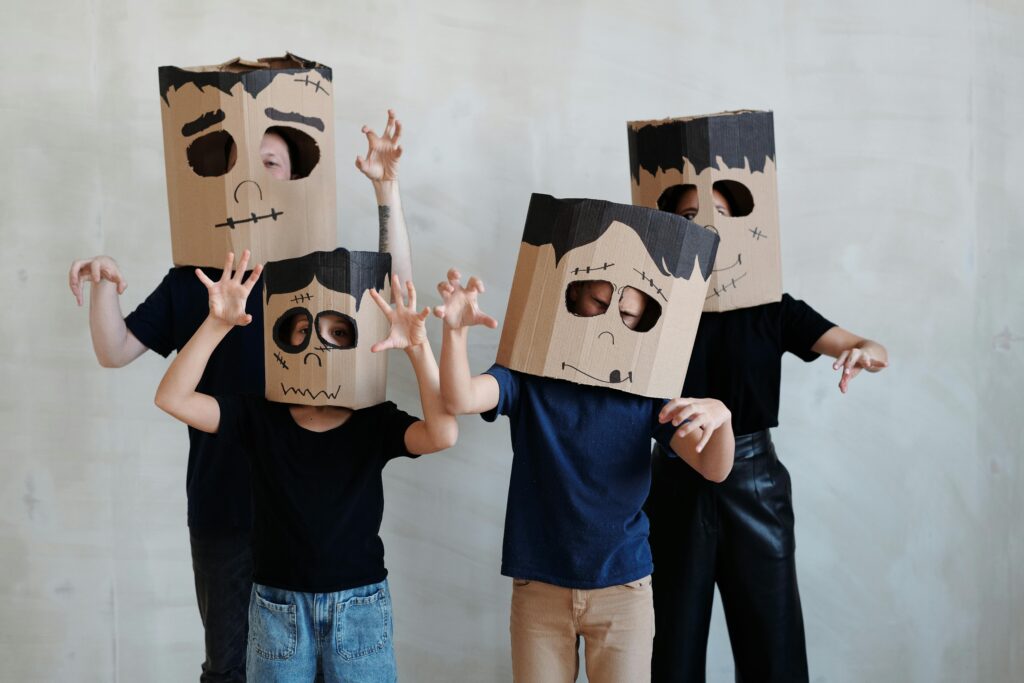
"Embrace the spirit of Halloween with easy, creative costumes that are simple, fun, and sure to impress!"


October is officially here, which means it’s time to embrace the excitement of Halloween! This month is filled with opportunities for students to showcase their creativity through costumes and the options are endless. 

To help you get started, we’ve compiled some easy costume ideas that are simple to put together and readily available. These options require minimal effort but are sure to be recognized by your friends and fellow students. So, as you dive into the spirit of Halloween, have fun experimenting with these character choices and enjoy celebrating the festivities in style!

Scooby-Doo Characters

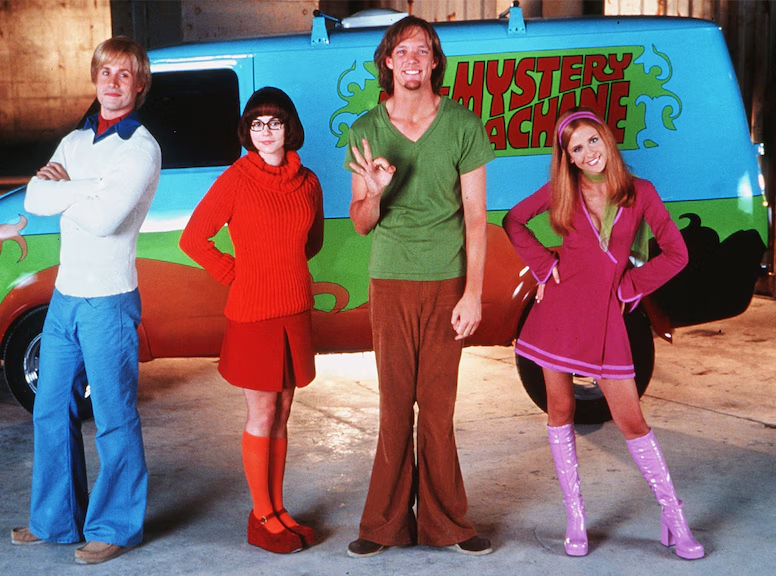
Each character brings their unique style and vibrant colours to the mix, making it easy to recognize them. For example, Fred features his classic blue jeans paired with a crisp white shirt, while Daphne stands out in her eye-catching purple ensemble from head to toe. Velma embodies a classic look with her orange sweater and red skirt combination, complete with her signature glasses. And let’s not forget Shaggy, who is instantly recognizable in his brown trousers and laid-back green t-shirt.

If you’re considering a group costume, coordinating these characters can create a lively vibe among friends. If you happen to have a dog, you can include him in the fun by dressing him as Scooby-Doo himself. With his recognizable brown fur and playful demeanor, your pup will surely steal the show!

Wednesday and Pugsley Addams

Dressing up as Wednesday and Pugsley Addams is an excellent choice for siblings looking to tap into the spooky charm of the Addams Family. These two beloved characters perfectly capture the family’s quirky essence, making them an ideal duo for Halloween. Wednesday is instantly recognizable in her long black dress, paired with white socks and her signature braided black hair, embodying her dark and moody style. Pugsley complements her look with his classic striped shirt, short pants, and black socks, adding a playful touch that showcases the family’s whimsical spirit.

This costume combination not only showcases the unique personalities of both characters but also allows siblings to have fun dressing up together. 

The Mask

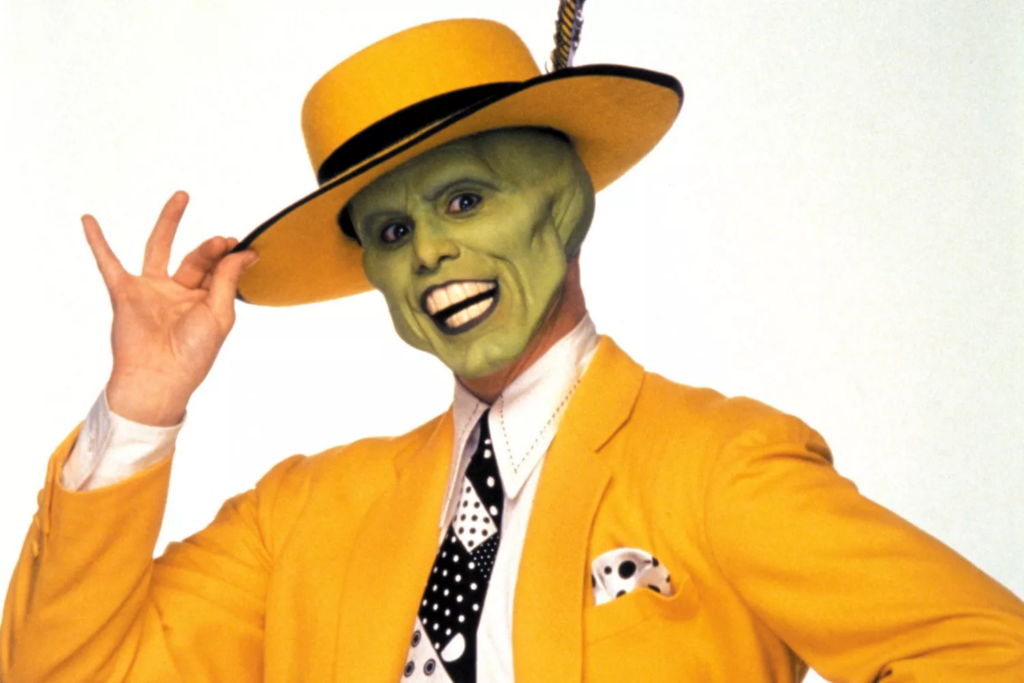
This costume is a fantastic option for students who want to stand out and have a bit of fun. To pull off this look, start with a bright yellow suit, pair it with a crisp white shirt and a vibrant tie to complete the ensemble. Don’t forget the iconic yellow fedora hat, which adds that finishing touch and really ties the whole look together.

The most essential part of this costume, however, is the face paint. A striking green face will transform you into the zany character known for his wild antics and humor. This vibrant hue will ensure you’re easily recognizable and ready to entertain. 

Minion

For an easy DIY Minion costume, start with a bright yellow long-sleeve shirt or a cozy yellow sweater as the base. Then, pair it with a denim jumpsuit for that classic Minion look. Don’t forget a pair of goggles, which are essential to capture the playful spirit of these characters. To finish off your outfit, add a yellow beanie for that extra touch of fun.

Woody and Jessie

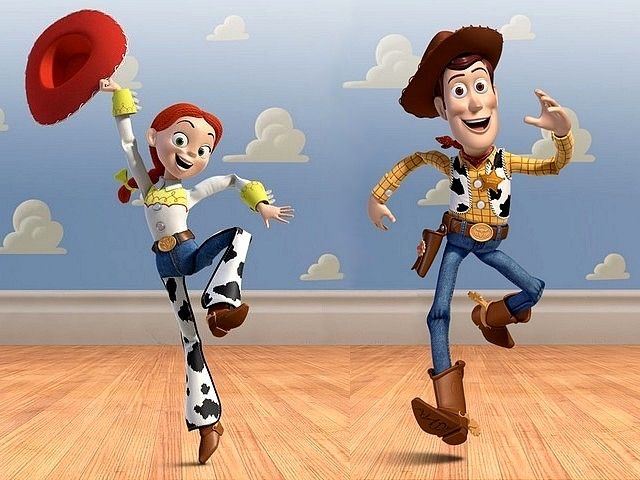
While Buzz Lightyear may require a bit more effort with his elaborate space suit, you can opt for a simpler yet equally fun duo: Woody and Jessie from Toy Story. These characters are not only iconic but also relatively easy to put together, making them perfect choices for kids looking for a great costume without too much hassle. 

To embody Woody, you’ll need a classic cowboy hat, a yellow plaid shirt, and a denim vest paired with jeans. Jessie, on the other hand, showcases her Western flair with a white and yellow shirt, along with blue jeans. To complete the look as Jessie, consider adding a red wig styled in braids, which will capture her playful spirit perfectly.

Coraline

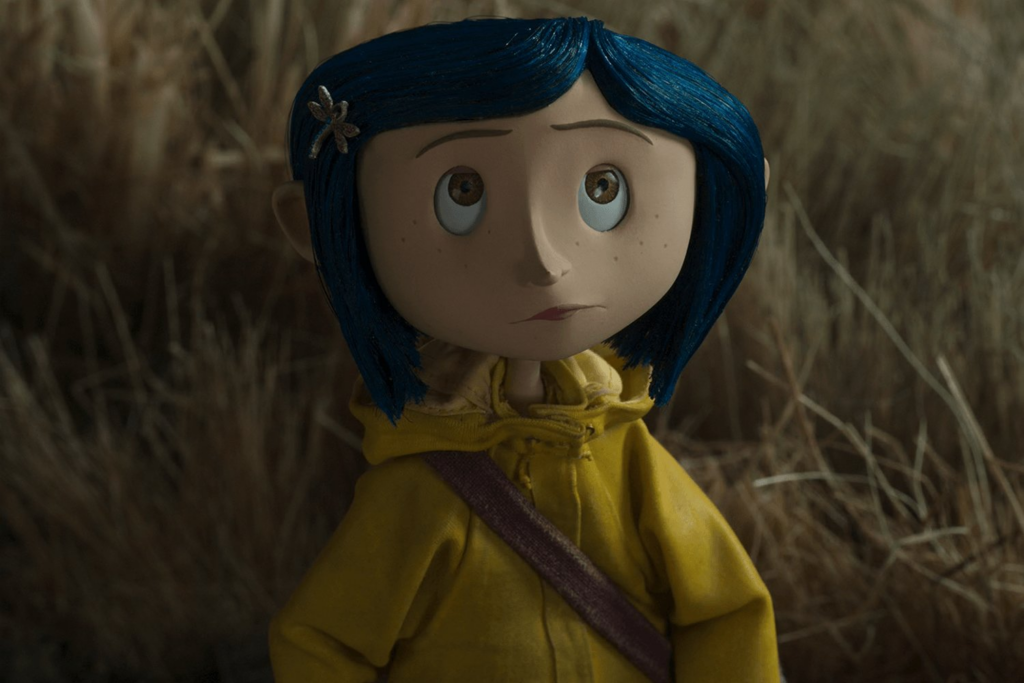
Dressing up as Coraline this Halloween is an excellent option for anyone wanting to embrace the spooky season with a distinctive character. Known for her blend of mystery and whimsy, Coraline is a perfect choice for Halloween festivities.

To achieve Coraline’s signature look, start with a bright yellow raincoat, which serves as the centerpiece of her outfit. Pair it with short blue hair, which you can easily create with a wig or temporary hair color.

Harry Potter Characters

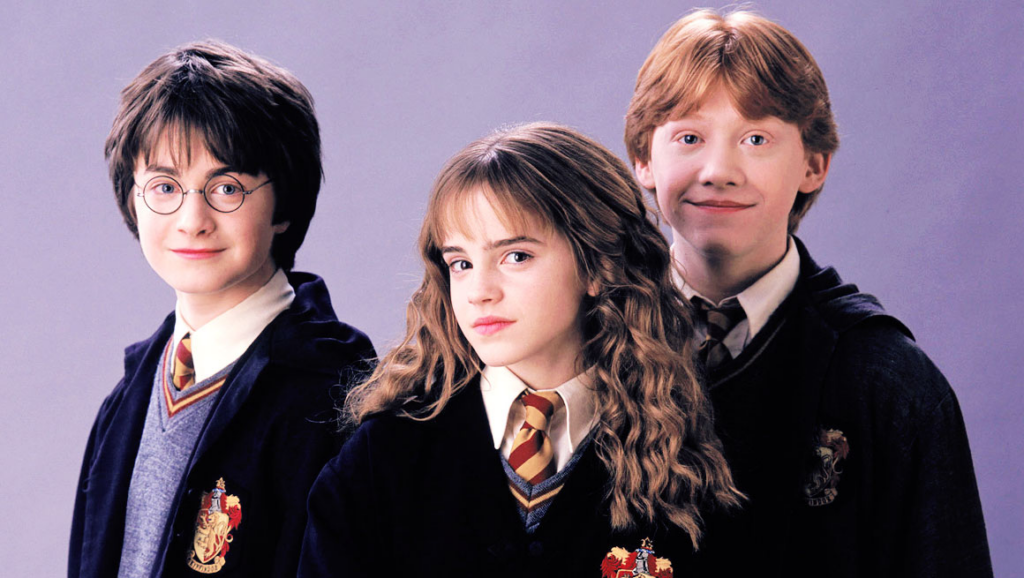
Dressing up as Harry Potter characters is a fantastic option for you and your best friends to go as Harry, Ron, and Hermione. Considering the popularity of the series, it’s easy to find the Hogwarts student costumes at local costume shops or even to rent online. You can check out options on Amazon for a variety of choices!

To truly embody Harry Potter, you’ll need a pair of glasses, dark brown short hair, and, of course, the famous lightning-shaped scar on your forehead. Ron Weasley is easy to spot with his ginger hair, so consider using a red wig or dyeing your hair for authenticity. For an extra touch, you might want to bring along a toy mouse to represent Ron’s beloved pet, Scabbers. Lastly, Hermione Granger can be brought to life with her long light brown hair, and don’t forget to carry a book to make your costume even more convincing. 

With a little creativity, you can craft the wand using a wooden stick or a painted cardboard tube or you could also use a black marker on a chopstick.

Ghostbusters

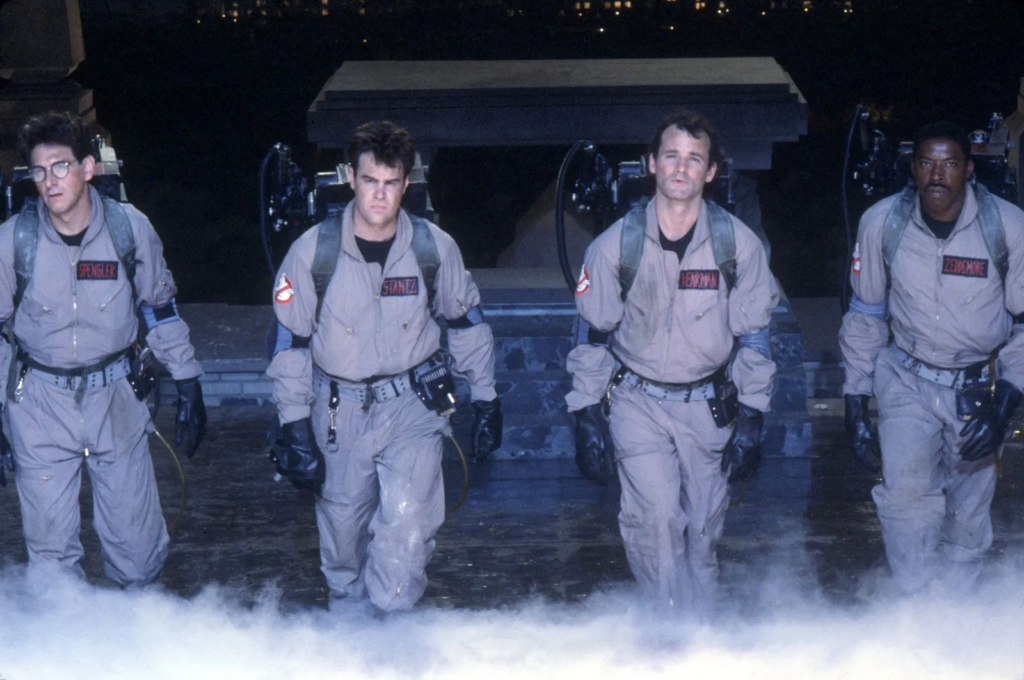
These characters are all about chasing ghosts and capturing the supernatural, making them a fitting choice for Halloween festivities. Like Harry Potter, the Ghostbusters are incredibly popular, so you’ll have no trouble finding costumes to rent or buy. For convenience, you can check out options on Amazon.

Since Ghostbusters is a group-themed costume, it’s a fantastic idea to get your friends involved and form your own team. Coordinating with your friends not only enhances the fun but also makes for a memorable group dynamic. 

Super Mario Bros

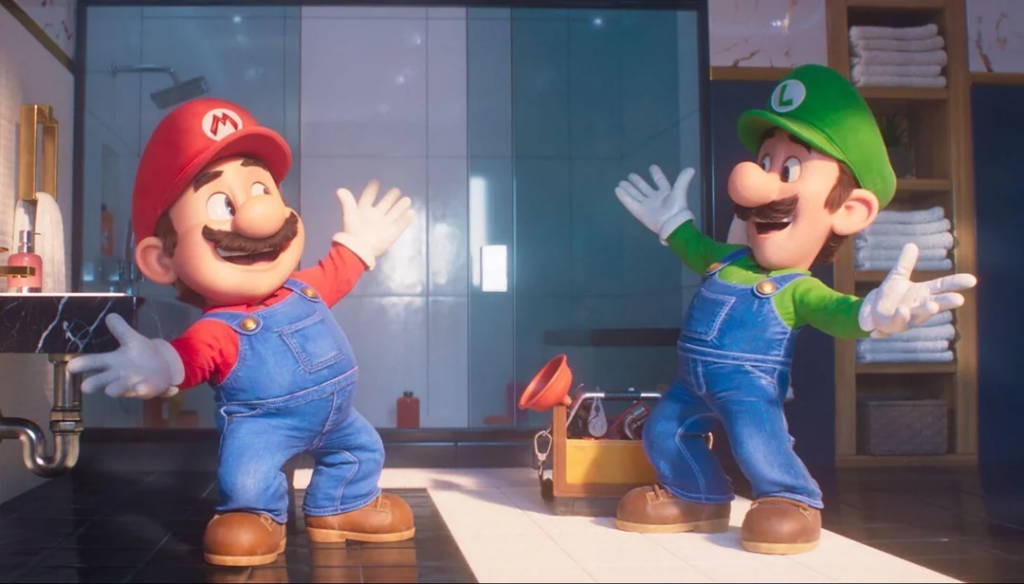
Dressing up as characters from Super Mario Bros. is one of the easiest costume options for Halloween! Whether you’re teaming up with a brother or a friend, the iconic duo of Mario and Luigi is instantly recognizable and always a hit. To embody Mario, opt for a red shirt, while Luigi can be represented with a green shirt, making it simple to coordinate your looks.

You can find store-bought hats to complete the outfits, or you can get creative and DIY on your own! Don’t forget to add some fun accessories like mustache sets, suspenders, and white gloves to really bring the characters to life. 

One Piece Characters

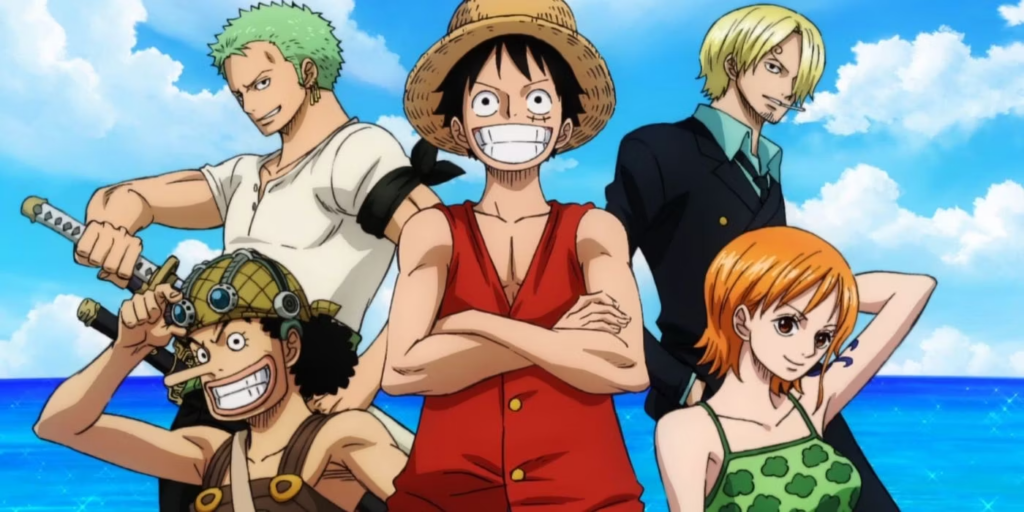
Dressing up as characters from One Piece is a fantastic choice especially since there are so many iconic figures to choose from. While there are numerous characters in the series, opting for the main crew members will make your selection easier. For example, Sanji can be easily recognised in a black suit paired with black shoes and his signature short yellow hair. Usopp can be brought to life with a brown jumpsuit, a white bandana, and brown boots, plus don’t forget to carry a slingshot for that extra touch.

Zoro requires a white shirt, black pants, and a black bandana, along with a couple of toy swords to complete his look. His distinct green short hair adds to the character’s recognizable appearance. Lastly, Luffy is perhaps the easiest to pull off; all you need is a red vest, a straw hat, short jeans, and sandals. 

There you have it—plenty of Halloween costume options to choose from this year! Whether you decide to dress up as a classic character or something more unique, the key is to have fun and express your creativity. So, put on your costumes, enjoy the festivities, and make lasting memories with those around you!

5 Exciting DIY Projects for Children to Create at Home

Nadya Sharfina · March 12, 2024 · Leave a Comment

"Build bonds and memories through creative DIY projects with your child, fostering communication and skills that last a lifetime."

Engaging in DIY projects with your child is an excellent opportunity to strengthen your bond and encourage open communication enjoyably and creatively. Through various DIY projects, such as science experiments, artistic pursuits, or hands-on crafting projects, your child can acquire valuable knowledge and develop practical skills. Transforming your home into a hub of DIY creativity offers a fulfilling way to make your stay-at-home moments enjoyable and memorable for the entire family.

Bookcase

Photo by Lesly Juarez on Unsplash

If your child is a bookworm, a bookcase can be a valuable addition to your home. Not only does it provide a dedicated space for their growing collection, but it also encourages them to read more. For instance, as they finish one book, you can reward them with another, fostering a continuous love for reading. While DIY projects like building a bookcase may demand time and effort, they offer an opportunity for you and your child to bond. Engaging in such projects allows your child to become familiar with household tools, learn about construction, and develop practical skills that can be applied in various aspects of life.

Materials Needed:

  • Wood boards (such as pine or plywood) for shelves and sides
  • Wood screws
  • Wood glue
  • Wood stain or paint (optional)
  • Sandpaper
  • Drill
  • Saw (circular saw or hand saw)
  • Measuring tape
  • Level

Instructions:

Step 1: Measure and cut the wood boards according to your desired bookcase dimensions. You’ll need pieces for the sides, shelves, and back panel.

Step 2: Attach the sides to the shelves using wood glue and screws to create the frame of the bookcase. Make sure everything is square and level.

Step 3: Attach the back panel to the frame using screws and wood glue. This adds stability to the bookcase.

Step 4: Sand the entire bookcase to smooth out any rough edges or surfaces. Apply wood stain or paint according to your preference. Let it dry completely.

Step 5: Use a stud finder to locate wall studs. Secure the bookcase to the wall using screws and wall anchors if necessary, especially for taller bookcases.

Step 6: Once the bookcase is securely installed, arrange your books and other items on the shelves as desired.

Terrarium

Photo by Maud Bocquillod on Unsplash

Embarking on the journey of building a terrarium with your child offers a delightful blend of creativity and education. As you construct the terrarium, you and your child can delve into the world of biology, learning about the plants you’re nurturing. Once the project is complete, it’s important to remind your child about the maintenance required to keep the plants thriving. This hands-on experience not only beautifies your living space but also provides ongoing opportunities for learning and connection with nature.

Materials Needed:

  • Glass container or jar with a wide opening
  • Gravel or small rocks
  • Activated charcoal (optional)
  • Potting soil suitable for terrariums
  • Small plants (succulents, ferns, mosses, air plants)
  • Decorative elements (small figurines, rocks, driftwood)
  • Spray bottle filled with water
  • Gloves (optional)

Instructions:

Step 1: Get a glass container that’s wide enough for easy planting. You can pick clear or coloured glass, and decide if you want it open or closed.

Step 2: Put some small rocks at the bottom for drainage. This keeps water from pooling and causing root rot. You can also add a bit of charcoal on top to keep things fresh.

Step 3: Add potting soil on top of the rocks, about 1-2 inches deep.

Step 4: Take your plants out of their pots, loosen up the roots, and plant them in the soil. Arrange them so they look nice and have space to grow.

Step 5: Spruce up your terrarium with little decorations like figurines or rocks. Just don’t go overboard and crowd the plants.

Step 6: Use a spray bottle to water the soil and plants lightly. Don’t drown them, and only water when the soil feels dry.

Step 7: Put your terrarium where it gets indirect sunlight or bright, filtered light. Avoid direct sunlight, which can fry your plants.

Step 8: Keep an eye on your terrarium for too much water, bugs, or extra growth. Trim any dead leaves and tidy up the soil. With good care, your terrarium will be a lovely addition to your home.

Birdhouse

Photo by Lubomirkin on Unsplash

Constructing a bird feeder or birdhouse can be a delightful project for your child, offering a charming way to entice birds into your balcony or yard while simultaneously providing them with sustenance and shelter. Encouraging your child to participate in building the feeder or house fosters their creativity and nurtures a sense of responsibility towards wildlife. As they observe the birds frequenting their creation, they can learn about different bird species and their behaviours, fostering a deeper connection to the natural world around them.

Materials Needed:

  • Wood boards
  • Wood screws
  • Wood glue
  • Drill
  • Saw
  • Sandpaper
  • Paint or wood stain (optional)

Instructions:

Step 1: Decide on the type and size of birdhouse you want to build. You can find many free plans and designs online.

Step 2: Cut the wood boards according to the dimensions of your chosen design.

Step 3: Assemble the birdhouse using wood glue and screws. Make sure to leave an entrance hole for the birds.

Step 4: Drill drainage holes in the bottom of the birdhouse to allow water to escape and prevent the nesting area from becoming waterlogged.

Step 5: Sand the birdhouse to smooth out any rough edges. You can also paint or stain it to add colour and weather protection.

Step 6: Place the birdhouse in a suitable location, preferably mounted on a pole or hanging from a tree branch.

Step 7: Once installed, keep an eye on your birdhouse and enjoy watching the birds that come to nest in it.

Tissue Box

Photo by amazon.com

A handmade tissue box adds a touch of personalised charm to your home decor, showcasing your child’s artistic skills in a unique way. It can be placed in the living room, kitchen, bedrooms, or any other desired location. Your children can explore different artistic techniques and themes, allowing their creativity to shine through in every brushstroke or design choice. Remember to prioritise cleanliness as you incorporate this decorative piece into your home. 

Materials Needed:

  • Cardboard tissue box
  • Fabric of your choice (cotton, linen, or any fabric you like)
  • Scissors
  • Fabric glue or sewing machine
  • Decorative elements (buttons, ribbons, etc.)

Instructions:

Step 1: Lay your fabric flat and place the tissue box on top. Leave enough fabric around the box to cover it completely, with a little extra for seam allowances. Measure and cut the fabric according to the dimensions of the tissue box, adding about 1 inch (2.5 cm) to each side for seam allowances.

Step 2: Fold the fabric in half with the right sides facing inwards. If your fabric has a pattern, make sure it’s facing the inside of the fold. Sew or glue the side seams together, leaving the top and bottom open. If sewing, use a straight stitch and backstitch at the beginning and end to secure the seams.

Step 3: Test the cover on the tissue box to ensure it fits nicely. Adjust the seams if necessary.

Step 4: Hem the raw edges at the top and bottom of the cover by folding them over about 1/4 inch (0.6 cm) and sewing or glueing them down. This will give the cover a clean, finished look.

Step 5: Get creative and personalise your tissue box cover by adding decorative elements like buttons, ribbons, or appliques. Glue or sew these embellishments onto the cover as desired.

Step 6: Once your cover is complete, slide the tissue box inside and adjust the fabric as needed to ensure it sits neatly inside the cover.

Step 7: Display your cute tissue box cover in any room of your home where tissues are needed. 

Custom Tote Bag

Photo by paper-and-glue.com

A custom tote bag DIY project is a practical endeavour for your child, offering them a versatile accessory they can carry anywhere, whether it’s to school, to the grocery store, or just hanging out with friends. It allows your child to embrace their inner artistic side, particularly if they aspire to be a designer. By customising their tote bag, they can express their creativity while also having a functional item that reflects their personality and style. 

Materials Needed:

  • Canvas tote bag
  • Fabric paints or markers
  • Paintbrushes
  • Stencils (optional)
  • Palette or paper plates for mixing paint
  • Fabric medium (if using regular acrylic paint)
  • Iron (for setting fabric paint)

Instructions:

Step 1: Lay out your canvas tote bag on a flat surface. Make sure to protect your work surface with newspaper or a drop cloth to prevent any paint spills or stains.

Step 2: Plan out your design before painting. Think about what inspires you—whether it’s art, quotes, or patterns—and lightly sketch your ideas with a pencil.

Step 3: Use fabric paints or markers to fill in your design. You can paint freely with brushes or use stencils for more precise patterns. If you’re using acrylic paint, mix it with fabric medium as per the instructions.

Step 4: Play with colours and textures to make your design pop. Painter’s tape can help create clean lines and shapes. Try different techniques to get the look you want.

Step 5: Let your tote bag dry completely to prevent smudging. This ensures the paint sticks well to the fabric.

Step 6: If you’re using fabric paint that requires heat setting, follow the instructions on the paint label. Typically, this involves ironing the painted area on the reverse side of the fabric to set the colours and make them washable.

Step 7: Once dry and set, add any final touches like your name or decorative elements such as buttons or patches. Your custom art tote bag is now ready to use!

These five recommended DIY projects offer fantastic opportunities for quality family time. Whether you engage in DIY activities with your children after their school day or during weekend downtime, they are sure to infuse an element of fun into your family’s time at home. Consider extending your DIY adventures into the kitchen with your kids, teaching them basic cooking skills that will prove invaluable as they grow older. Read Smart Food Choices for Kids’ During Exams. While some DIY projects may require time and patience, they are ultimately rewarding activities that strengthen bonds and create lasting memories for the entire family.

CURIO SG

Copyright © 2025 Curio Singapore · Log in

  • Home
  • Journal
  • Frequently Asked Questions
  • Contact
  • Careers
  • Free Resources